Learn how to insert custom Football Manager 2024 skins to your game. Straightforward, easy to follow guide on adding custom FM24 skins to your game.
Here is a quick tutorial on how to install custom Football Manager 2024
skins.
If you’re like me, you enjoy playing the game with base Football Manager skin because of its simplicity compared to custom-made FM2024 skins that come packed with a lot of custom-made panels. Not only that I enjoy the default skins more, but there is a smaller chance of getting a crash-dump error while using the default skin.
Custom-made skins are great, and they do change your game’s appearance, which can be refreshing from time to time. But they are not frequently updated, nor do they have the user feedback on GUI issues ( graphics user interface ) like the default ones do.
Hence, this is why you might encounter certain errors while you play the game. So basically, to lower the possibility of crash-dump errors, stick to the default Football Manager skin.
But if you’re eager to learn how to install custom Football Manager 2024 skins and want to freshen up the looks of your game, then read on.
How to insert custom FM24 skin
Luckily for all of you who want a brand new FM 24 skin, the FM community offers a large number of incredible custom-made skins available to download.
The following steps will work for Football Manager 2024, but also for the previous versions of FM as well.
1. Download the custom skin
Download from the internet the FM24 skin of your liking. Skins for FM 2024
will only work with FM 2024. You can’t add the skin from FM22 and expect it to
work on FM24 or any other version of Football Manager.
2. Extract the zip skin file
Extract the folder with ‘Winrar’ ( if you’re on Windows operating system ) or ‘The Unarchiver’ ( for Mac users).
For Windows users to extract, right-click on the file and hit ‘ ’. It will extract the content of the rar file at your current location.
For Windows users to extract, right-click on the file and hit ‘
 ’. It will extract the content of the rar file at your current location.
For Mac users, once you have downloaded the skins, you will need to extract
them using a dedicated tool such as Unarchiver Once the software is finished
extracting the file, a skin folder will appear in this location.
3. Place the skin in the 'skins' folder
Right-click on the extracted folder and hit ‘Cut’ and then ‘Paste’ in the
following location:
Windows users paste the folder to;
Windows users paste the folder to;
- C:\Users\\Documents\Sports Interactive\Football Manager 2024\skins\
Mac users do the following;
- Open finder
- Go – Go to folder – type in the path: Library/Application Support
- Click on Sports Interactive – Football Manager – Skins
4. Enable the skin in the game
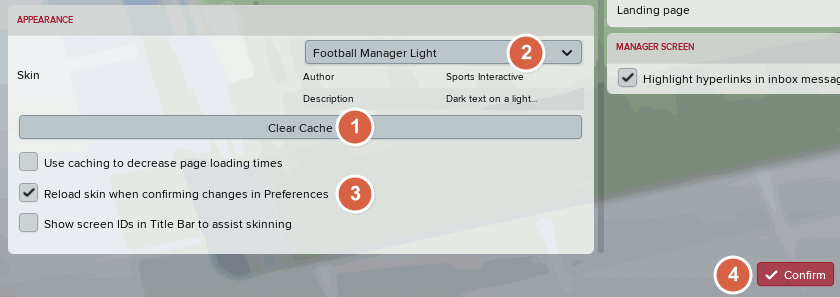
Navigate to 'Preferences' >> 'Advanced' >> 'Interface' to set the
in-game settings correctly:

Be sure to first clear the graphics cache by hitting the ‘Clear cache' from the 'Reset' drop-down button in the lower left corner of the Interface screen.
Also, be sure to enable the ‘Reload skin when confirming changes in Preferences’ is turned on.
After that, pick the skin you want and hit the ‘Confirm’ button.
It's great if you want a new skin for your game. But remember, custom skins can contribute to the number of crush dumps that will happen to you while playing FM24. If it is not necessary to change the skin, stick with the basic one that comes with the game.

Be sure to first clear the graphics cache by hitting the ‘Clear cache' from the 'Reset' drop-down button in the lower left corner of the Interface screen.
Also, be sure to enable the ‘Reload skin when confirming changes in Preferences’ is turned on.
After that, pick the skin you want and hit the ‘Confirm’ button.
Conclusion
It's great if you want a new skin for your game. But remember, custom skins can contribute to the number of crush dumps that will happen to you while playing FM24. If it is not necessary to change the skin, stick with the basic one that comes with the game.


